Ziti-Edge-Tunnel as Gateway
1.0 Introduction
1.1 Network Description
This guide demonstrates how to setup LAN gateways with Ziti-Edge-Tunnel for the purpose of transferring data between non-Ziti endpoints across Ziti Fabric.
For the demonstration, we will setup the network like below:

- There are two Ziti-Edge-Tunnels (local-tunnel and remote-tunnel) as LAN gateways.
- The Windows machine (Windows Client) is in the same subnet (172.16.31.0/24) as Tunneller (local-tunnel).
- The Ubuntu 22.04 server (Ubuntu Server) is in the same subnet (172.16.240.0/24) as Tunneller (remote-tunnel).
- The data (ssh) will be passed between the Windows Client and the Ubuntu Server.
1.2 Prerequisite
Please complete the following steps before continue with this demo.
- An open-ziti network should be created already. If not, please follow this quickstart Host OpenZiti Anywhere guide to setup open-ziti network first.
- Created two tunnellers already. The tunnelers should be running on Ubuntu 22.04. Please note, we support wide range of OSes for tunneler deployment. However, this demo uses Ubuntu 22.04 as example.
- Created one windows client already. Suggested windows version Windows 10 or Windows 11. Windows servers should work fine as well.
- Created one ubuntu server already. Or any linux server capable of accepting ssh and http connection.
- We also need at least one Transit Router and one Public Edge Router. The quickstart already setup a Edge Router with both transit and edge functionality. So if you used the quickstart guide, this should work already.
2.0 Setup Tunnellers
2.1 Create Tunnellers on the Controller
Login to your controller and create two identities named local-tunnel and remote-tunnel
ssh <user>@68.183.139.122
Then source the environmental file (only need to perform once per login).
source ~/.ziti/quickstart/$(hostname -s)/$(hostname -s).env
Login to ziti cli.
zitiLogin
Create identities and save the enrollment token to files.
ziti edge create identity user local-tunnel -o local-tunnel.jwt
ziti edge create identity user remote-tunnel -o remote-tunnel.jwt
output
root@LocalGWDemoNC:~# ziti edge create identity user local-tunnel -o local-tunnel.jwt
New identity local-tunnel created with id: PVen7KeIY5
Enrollment expires at 2023-04-26T23:02:10.200Z
root@LocalGWDemoNC:~# ziti edge create identity user remote-tunnel -o remote-tunnel.jwt
New identity remote-tunnel created with id: LtnYRL2IY
Enrollment expires at 2023-04-26T23:06:01.955Z
root@LocalGWDemoNC:~# ls -l *jwt
-rw------- 1 root root 893 Apr 26 20:02 local-tunnel.jwt
-rw------- 1 root root 892 Apr 26 20:06 remote-tunnel.jwt
add attribute to the identity, now we want to update the identities to have some attribute. The local-tunnel has attribute "clients". The remote-tunnel has attribute "hosts".
ziti edge update identity local-tunnel -a clients
ziti edge update identity remote-tunnel -a hosts
Check to make sure both identities are created correctly with right attribute.
root@LocalGWDemoNC:~# ziti edge list identities
╭────────────┬───────────────────────────┬────────┬────────────┬─────────────╮
│ ID         │ NAME                      │ TYPE   │ ATTRIBUTES │ AUTH-POLICY │
├────────────┼───────────────────────────┼────────┼────────────┼─────────────┤
│ TvWsTie6Y  │ remote-tunnel             │ User   │ hosts      │ default     │
│ gBWYMi26Y5 │ local-tunnel              │ User   │ clients    │ default     │
│ lIend76Tu  │ Default Admin             │ User   │            │ default     │
│ xCW0lSWpcn │ LocalGWDemoNC-edge-router │ Router │            │ default     │
╰────────────┴───────────────────────────┴────────┴────────────┴─────────────╯
results: 1-4 of 4
2.2 Setup the Tunneller For Windows Subnet
2.2.1 Register Identities
Login to your local-tunnel machine/VM. Follow Install Linux Package: Ubuntu Jammy 22.04 section to install and register your ziti-edge-tunnel. Use the local-tunnel.jwt created earlier for its identity token.
After the tunnel is registered, check the status and make sure it is running correctly. The status should show "active (running)"
ziggy@local-tunnel:~$ systemctl status ziti-edge-tunnel
● ziti-edge-tunnel.service - Ziti Edge Tunnel
     Loaded: loaded (/etc/systemd/system/ziti-edge-tunnel.service; enabled; vendor preset: enabled)
     Active: active (running) since Fri 2023-04-28 18:38:41 UTC; 3 days ago
<... output truncated ...>
2.2.2 setup ufw
The following steps turn on the ufw firewall and opens the ports for this demo.
sudo ufw enable
sudo ufw allow from any to 172.16.31.175/32 port 53 proto udp
sudo ufw allow from any to 172.16.31.175/32 port 22 proto tcp
sudo ufw allow from any to 172.16.31.175/32 port 80 proto tcp
2.2.3 setup forwarding
First setup IP forwarding in the Linux system.
echo "net.ipv4.ip_forward = 1" | sudo tee /etc/sysctl.d/01-ipforward.conf >/dev/null
sudo sysctl -p /etc/sysctl.d/01-ipforward.conf
Second, setup forwarding on the firewall from local interface to the tun interface created by ziti (tun0).
Find the local interface first, if you have only one local interface, this command can help you find the name of the interface.
ip -o -4 route show to default | awk '{print $5}'
output
ziggy@local-tunnel:~$ ip -o -4 route show to default | awk '{print $5}'
ens160
Now setup the forwarding on ufw
sudo ufw route allow in on ens160 out on tun0
2.3 Setup the Tunneller For Ubuntu Server Subnet
2.3.1 Register Identities
Login to your remote-tunnel machine/VM. Register the tunneler by using remote-tunnel.jwt token with the instructions mentioned in this section.
2.3.2 setup ufw
For this demo, we only show the connection initiated from local-tunnel side towards remote-tunnel. The ufw rules below are not needed. If you want to have bidirectional connections, you will need to setup these rules.
sudo ufw enable
sudo ufw allow from any to 172.16.240.130/32 port 53 proto udp
sudo ufw allow from any to 172.16.240.130/32 port 22 proto tcp
sudo ufw allow from any to 172.16.240.130/32 port 80 proto tcp
3.0 Setup Client and Server
3.1 Ubuntu Server
The Ubuntu Server needs to support ssh (port 22) and http (port 8000) for our demo.
Make sure these ports are open on the firewall.
sudo ufw enable
sudo ufw allow from any to 172.16.240.129/32 port 22 proto tcp
sudo ufw allow from any to 172.16.240.129/32 port 8000 proto tcp
Next, start the webserver. The web server will be listening on the port 8000.
echo "You have reached Remote Web Server." >hello.txt
python3 -m http.server
3.2 Windows Client
There are two changes we need to make on the windows side.
The first one, we need to change the configuration of the preferred DNS to point to our resolver on the local-tunnel, the resolver is listening on "100.64.0.2".

The second change is to setup routing.
- We need to route the 100.64.0.0/10 traffic to our local-tunnel. Any DNS based intercept resolved to the IP in the subnet 100.64.0.0/10.
- We also need to route 172.16.240.129/32 to local-tunnel. 172.16.240.129 is IP we intended to intercept and pass through ziti fabric.
To do this, open an cmd window as Administrator.
route add 100.64.0.0 mask 255.192.0.0 172.16.31.175
route add 172.16.240.129 mask 255.255.255.255 172.16.31.175

4.0 ssh Service Configuration
We make all configuration changes on the controller. Login to the controller and connect to ziti cli first.
ssh <user>@68.183.139.122
Example on how to start CLI with quickstart created controller:
source ~/.ziti/quickstart/$(hostname -s)/$(hostname -s).env
zitiLogin
4.1 Create an intercept.v1 config
This config is used for local side connection. We are setting up intercept on DNS name "mysimpleservice.ziti"
ziti edge create config ssh-intercept-config intercept.v1 '{"protocols": ["tcp"], "addresses": ["mysimpleservice.ziti"], "portRanges": [{"low": 22, "high": 22}]}'
4.2 Create a host.v1 config
This config is used for remote side connection. We are setting up the address the remote server can reach. In this demo, We are dropping the traffic off at "172.16.240.129"
ziti edge create config ssh-host-config host.v1 '{"address":"172.16.240.129", "protocol":"tcp", "port":22}'
If the config command were successfully, you will see two configs by using "list configs" command:
root@LocalGWDemoNC:~# ziti edge list configs
╭────────────────────────┬──────────────────────┬──────────────╮
│ ID                     │ NAME                 │ CONFIG TYPE  │
├────────────────────────┼──────────────────────┼──────────────┤
│ 2U1aRwQCQMHTdrrPTkoafR │ ssh-host-config      │ host.v1      │
│ 6eduUGlPVvvqCruHc1V7Zd │ ssh-intercept-config │ intercept.v1 │
╰────────────────────────┴──────────────────────┴──────────────╯
results: 1-2 of 2
4.3 Create ssh Service
Now we need to put these two configs into a service. We going to name the service "ssh" and assign an attribute "tun-hosted"
ziti edge create service ssh -c ssh-intercept-config,ssh-host-config -a tun-hosted
Check Service by using "list service"
root@LocalGWDemoNC:~# ziti edge list services
╭────────────────────────┬──────┬────────────┬─────────────────────┬────────────╮
│ ID                     │ NAME │ ENCRYPTION │ TERMINATOR STRATEGY │ ATTRIBUTES │
│                        │      │  REQUIRED  │                     │            │
├────────────────────────┼──────┼────────────┼─────────────────────┼────────────┤
│ 4I7PmAQZ6GhTKkzTRhN0Ac │ ssh  │ true       │ smartrouting        │ tun-hosted │
╰────────────────────────┴──────┴────────────┴─────────────────────┴────────────╯
results: 1-1 of 1
4.4 Create Service-Edge-Router-Policy
This step is optional if you used quickstart. The service-edge-router-policy already includes "#all" service roles to "#all" edge router roles as displayed on the screen capture below.
But in case you need to add a policy, here is the command to add the service tag we created (tun-hosted) to all routers.
ziti edge create service-edge-router-policy ssh-serp --edge-router-roles '#all' --service-roles '#tun-hosted' --semantic 'AnyOf'
Check your service-edge-router-policy, and make sure the policy name "ssh-serp" is created. The automatically created one is called "allSvcAllRouters".
root@LocalGWDemoNC:~# ziti edge list service-edge-router-policies
╭────────────────────────┬──────────────────┬───────────────┬───────────────────╮
│ ID                     │ NAME             │ SERVICE ROLES │ EDGE ROUTER ROLES │
├────────────────────────┼──────────────────┼───────────────┼───────────────────┤
│ 5QzQPx6EUOJXT0hTm26Vuc │ allSvcAllRouters │ #all          │ #all              │
│ 70HiRuxK2JHjz9AuuzEhBt │ ssh-serp         │ #tun-hosted   │ #all              │
╰────────────────────────┴──────────────────┴───────────────┴───────────────────╯
results: 1-2 of 2
4.5 Create Bind policies
We need to specify which identity (in our case, #hosts) is going to host the service by setting up a bind service policy
ziti edge create service-policy ssh-bind Bind --identity-roles "#hosts" --service-roles '#tun-hosted' --semantic 'AnyOf'
4.6 Create Dial policies
We also need to specify which identity (in this case, #clients) is going to intercept the service by setting up a dial service policy
ziti edge create service-policy ssh-dial Dial --identity-roles "#clients" --service-roles '#tun-hosted' --semantic 'AnyOf'
If both policies are setup correctly, you should see two service-policies.
root@LocalGWDemoNC:~# ziti edge list service-policies
╭────────────────────────┬──────────┬──────────┬───────────────┬────────────────┬─────────────────────╮
│ ID                     │ NAME     │ SEMANTIC │ SERVICE ROLES │ IDENTITY ROLES │ POSTURE CHECK ROLES │
├────────────────────────┼──────────┼──────────┼───────────────┼────────────────┼─────────────────────┤
│ 5hzzeiQBcao4VpQWv645Al │ ssh-bind │ AnyOf    │ #tun-hosted   │ #hosts         │                     │
│ 5zLKYSfTSXojhZGhFC8uYF │ ssh-dial │ AnyOf    │ #tun-hosted   │ #clients       │                     │
╰────────────────────────┴──────────┴──────────┴───────────────┴────────────────┴─────────────────────╯
results: 1-2 of 2
4.7 Create Edge-Router-Policy and Public Edge-Router
The Tunnellers need to connect to Public Edge-Router to pass traffic as depict in the network diagram.
The quickstart already created an public router and the edge-router-policy. You can check the edge-routers and edge-router-policies.
- There should be one edge router has "edge router roles" of "#public".
- One policy (named "allEdgeRouters") with "edge router roles" of "#public" and "identity roles" of "#all".
root@LocalGWDemoNC:~# ziti edge list edge-routers
╭────────────┬───────────────────────────┬────────┬───────────────┬──────┬────────────╮
│ ID         │ NAME                      │ ONLINE │ ALLOW TRANSIT │ COST │ ATTRIBUTES │
├────────────┼───────────────────────────┼────────┼───────────────┼──────┼────────────┤
│ xCW0lSWpcn │ LocalGWDemoNC-edge-router │ false  │ true          │    0 │ public     │
╰────────────┴───────────────────────────┴────────┴───────────────┴──────┴────────────╯
results: 1-1 of 1
root@LocalGWDemoNC:~# ziti edge list edge-router-policies
╭────────────────────────┬───────────────────────────────┬────────────────────────────┬────────────────────────────╮
│ ID                     │ NAME                          │ EDGE ROUTER ROLES          │ IDENTITY ROLES             │
├────────────────────────┼───────────────────────────────┼────────────────────────────┼────────────────────────────┤
│ 1obfCQ6vhYabkXb61DqjU  │ allEdgeRouters                │ #public                    │ #all                       │
│ xCW0lSWpcn             │ edge-router-xCW0lSWpcn-system │ @LocalGWDemoNC-edge-router │ @LocalGWDemoNC-edge-router │
╰────────────────────────┴───────────────────────────────┴────────────────────────────┴────────────────────────────╯
results: 1-2 of 2
If you need to create a public Edge-Router, you can follow this guide: Create Public Edge Router. If you need to create an edge-router-policy, you can follow this guide: Create edge-router-policy.
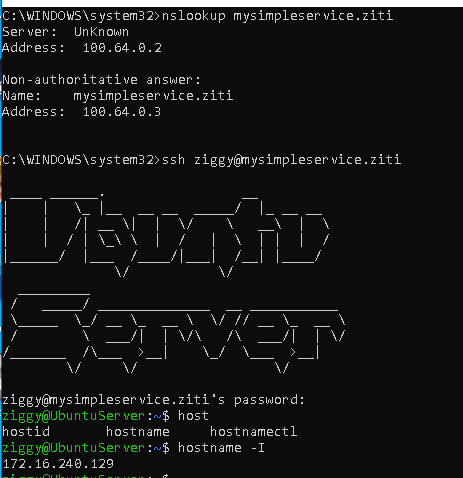
4.8 Test the service
Connect to the Windows Client machine, open a cmd window.
First, try to nslookup mysimpleservice.ziti. This should resolve to a 100.64.0.* address.
Then you should be able ssh to mysimpleservice.ziti.
5.0 http Service Configuration
In the previous section, we showed how to configure a DNS based intercept via open-ziti. In this section, we going to show how to setup interception via IP address. If you followed the instruction in the 3.2 Windows Client section, the routing for the intercept traffic to local-tunnel node is ready set. (route add 172.16.240.129 mask 255.255.255.255 172.16.31.175)
We can login to the controller to perform the configurations.
ssh <user>@68.183.139.122
source ~/.ziti/quickstart/$(hostname -s)/$(hostname -s).env
zitiLogin
5.1 Create an intercept.v1 config
Create intercept config on IP: 172.16.240.129 and port 80 for http traffic.
ziti edge create config http-intercept-config intercept.v1 '{"protocols": ["tcp"], "addresses": ["172.16.240.129"], "portRanges": [{"low": 80, "high": 80}]}'
5.2 Create a host.v1 config
Create Host config on IP: 172.16.240.129 and port 8000. As you can see, we have redirected traffic intended for port 80 (from client) to port 8000 (on the host).
ziti edge create config http-host-config host.v1 '{"address":"172.16.240.129", "protocol":"tcp", "port":8000}'
If the command finished successfully, you will see two more configs created, their names start with "http":
root@LocalGWDemoNC:~# ziti edge list configs
╭────────────────────────┬───────────────────────┬──────────────╮
│ ID                     │ NAME                  │ CONFIG TYPE  │
├────────────────────────┼───────────────────────┼──────────────┤
│ 2U1aRwQCQMHTdrrPTkoafR │ ssh-host-config       │ host.v1      │
│ 3raxTxDn1IRBKcgAEi5ZbM │ http-host-config      │ host.v1      │
│ 6eduUGlPVvvqCruHc1V7Zd │ ssh-intercept-config  │ intercept.v1 │
│ 7M6TQ3Rlw2XP6dI2fas7fC │ http-intercept-config │ intercept.v1 │
╰────────────────────────┴───────────────────────┴──────────────╯
results: 1-4 of 4
5.3 Create http Service Put these two configs into a service. We going to name the service "http" and assign an attribute "tun-hosted"
ziti edge create service http -c http-intercept-config,http-host-config -a tun-hosted
Check Service
root@LocalGWDemoNC:~# ziti edge list services
╭────────────────────────┬──────┬────────────┬─────────────────────┬────────────╮
│ ID                     │ NAME │ ENCRYPTION │ TERMINATOR STRATEGY │ ATTRIBUTES │
│                        │      │  REQUIRED  │                     │            │
├────────────────────────┼──────┼────────────┼─────────────────────┼────────────┤
│ 3OUoCk9Oo7xfOxaUZjhzUq │ http │ true       │ smartrouting        │ tun-hosted │
│ 4I7PmAQZ6GhTKkzTRhN0Ac │ ssh  │ true       │ smartrouting        │ tun-hosted │
╰────────────────────────┴──────┴────────────┴─────────────────────┴────────────╯
results: 1-2 of 2
5.4 Service-Edge-Router-Policy
Since we used same attribute for http service as the attribute for ssh service, we don't need another service-edge-router-policy. The original service-edge-router-policy was done in this section.
5.5 Bind and Dial policies
We also do not need to create new Bind and Dial policies. Since our host identity (#hosts) and service attribute (#tun-hosted) did not change for bind policy. And our client identity (#clients) and service attribute (#tun-hosted) did not change for dial policy.
5.6 Test the service
Connect to the Windows Client machine, open a web browser. Enter this address (http://172.16.240.129/hello.txt). You should see the text we entered earlier on the ubuntu server

Appendix
A.1 Create Public Edge Router
A.1.1 Create edge-router
Create an VM (Ubuntu 22.04) on the public cloud. ssh into that machine.
Retrieve ziti_router_auto_enroll to setup your router.
wget https://github.com/netfoundry/ziti_router_auto_enroll/releases/latest/download/ziti_router_auto_enroll.tar.gz
tar xf ziti_router_auto_enroll.tar.gz
You should have a file ziti_router_auto_enroll under the directory.
Get all the required information from controller:
root@LocalGWDemoNC:~# curl -s eth0.me
68.183.139.122  <--- Controller IP
root@LocalGWDemoNC:~# echo $ZITI_CTRL_PORT
8440  <--- Controller Fabric Port
root@LocalGWDemoNC:~# echo $ZITI_EDGE_CONTROLLER_PORT
8441  <--- Controller Management Port
root@LocalGWDemoNC:~# echo $ZITI_PWD
Test@123  <--- Controller Passwd
We are going to use Router Name: DemoPublicER
A.1.2 Enroll edge-router
sudo ./ziti_router_auto_enroll -f -n --controller 68.183.139.122 --controllerFabricPort 8440 --controllerMgmtPort 8441 --adminUser admin --adminPassword Test@123 --disableHealthChecks --disableMetrics --assumePublic --routerName DemoPublicER
Check to make sure ziti-router is running correctly
root@LocalGWDemoER:~# systemctl status ziti-router
● ziti-router.service - Ziti-Router
     Loaded: loaded (/etc/systemd/system/ziti-router.service; enabled; vendor preset: enabled)
     Active: active (running) since Thu 2023-04-27 15:23:59 UTC; 2min 31s ago
   Main PID: 2894 (ziti)
      Tasks: 6 (limit: 2323)
     Memory: 16.5M
        CPU: 435ms
     CGroup: /system.slice/ziti-router.service
             └─2894 /opt/ziti/ziti router run /opt/ziti/config.yml
expected output: The status should show "active (running)"
Assign the attribute (#public) to the router. Here is how to do it from the router.
/opt/ziti/ziti edge login 68.183.139.122:8441 -u admin -p Test@123 -y
/opt/ziti/ziti edge update edge-router DemoPublicER -a public
Verify the router attribute got assigned correctly.
root@LocalGWDemoER:~# /opt/ziti/ziti edge list edge-routers
╭────────────┬───────────────────────────┬────────┬───────────────┬──────┬────────────╮
│ ID         │ NAME                      │ ONLINE │ ALLOW TRANSIT │ COST │ ATTRIBUTES │
├────────────┼───────────────────────────┼────────┼───────────────┼──────┼────────────┤
│ hzb8uoeIY5 │ DemoPublicER              │ true   │ true          │    0 │ public     │
│ xCW0lSWpcn │ LocalGWDemoNC-edge-router │ false  │ true          │    0 │ public     │
╰────────────┴───────────────────────────┴────────┴───────────────┴──────┴────────────╯
results: 1-2 of 2
A.1.3 setup ufw
The following steps turn on the ufw firewall and opens the ports for this demo.
sudo ufw enable
sudo ufw allow 22/tcp
sudo ufw allow 80/tcp
sudo ufw allow 443/tcp
A.2 Create edge-router-policy
The edge-router-policy sets up the access point (Edge Routers) to the ziti fabric for the identities (Tunnellers).
There are many approaches on how to create policies to suit your need. For example, you may want to create policy for identities on the west coast to connect to ER in west coast. And policy for east coast identities to connect to east coast ER. But fine tuning edge-route-policy is beyond the scope of this demo. Here, we are going to show you a simple policy for all identities.
A.2.1 edge-router-policy for all identities
We will create an edge-router-policy for all identities to connect to public routers. Here is how to do it from the router.
/opt/ziti/ziti edge login 68.183.139.122:8441 -u admin -p Test@123 -y
/opt/ziti/ziti edge create edge-router-policy demoEdgeRouterPolicy --edge-router-roles '#public' --identity-roles '#all'
Check to make sure the policy was created correctly.
root@LocalGWDemoER:~# /opt/ziti/ziti edge list edge-router-policies
╭────────────────────────┬───────────────────────────────┬────────────────────────────┬────────────────────────────╮
│ ID                     │ NAME                          │ EDGE ROUTER ROLES          │ IDENTITY ROLES             │
├────────────────────────┼───────────────────────────────┼────────────────────────────┼────────────────────────────┤
│ 2zFwqfbeCsVkR4PWP8ELuc │ demoEdgeRouterPolicy          │ #public                    │ #all                       │
╰────────────────────────┴───────────────────────────────┴────────────────────────────┴────────────────────────────╯